Introduction
In the world of high-volume, industrial embroidery, precision is non-negotiable. ZSK machines are the gold standard, renowned for their blistering speed, pinpoint accuracy, and unwavering reliability in demanding production environments. But their performance hinges on one critical factor: the quality of the embroidery file they are given. You can’t feed a ZSK a generic file and expect champion results. The process to convert designs for ZSK embroidery machines is a specialized discipline, distinct from preparing files for home or light commercial machines. Whether you’re a new technician in a large shop or a business owner investing in your first industrial machine, this guide breaks down the exact methods and considerations you need to transform any design into a file that lets a ZSK perform at its peak.
Understanding the ZSK Ecosystem: It’s All About .ZXY
Before conversion, you must understand the target. ZSK machines primarily run on their proprietary .ZXY file format. This isn’t just a stitch file; it’s a highly optimized instruction set that leverages ZSK’s specific hardware capabilities, like advanced stitch modulation and precise thread tension commands. Think of a .DST file as a general map. A .ZXY file is a turn-by-turn navigation system built for a Formula 1 car—it accounts for the vehicle’s unique performance characteristics.
Therefore, to convert designs for ZSK embroidery machines, you’re not simply changing a file extension. You are engineering a design for high-speed execution, which involves optimizing stitch paths, minimizing trims, setting ZSK-specific parameters, and ensuring the density and compensation are calibrated for industrial heads moving at 1,200+ stitches per minute. Poor file preparation here doesn’t just mean a flawed design—it risks thread breaks, needle strikes, and unnecessary wear on a significant capital investment.
Method 1: ZSK’s Native Software Suite (The Professional Standard)
For shops running ZSK machines, investing in the manufacturer’s software is not an option; it’s a necessity. This software is built from the ground up to create perfect .ZXY files.
Core Software: ZSK JCK 5 (or latest version)
This is the comprehensive suite that includes:
-
Design Center: For editing, lettering, and basic digitizing.
-
Stitch Editor: For deep, stitch-level editing and optimization.
-
Motif Converter: The crucial tool for converting other file formats (like .DST, .PES, .EXP) into the .ZXY format.
The Conversion & Optimization Workflow:
-
Import: Bring your source file (.DST, .EMB, etc.) into the Motif Converter or Design Center.
-
Clean & Analyze: Use the software tools to analyze stitch count, trim count, and stitch density. Clean up unnecessary commands from the original file.
-
Optimize for ZSK: This is the critical step. Set ZSK-specific parameters:
-
Stitch Compensation: Fine-tune for the specific backing and material.
-
Trim Optimization: Configure trim points to maximize efficiency at high speed.
-
Stitch Types: Ensure satin and fill stitches are set for industrial execution.
-
-
Export as .ZXY: Save the newly engineered file in the native ZSK format, ready for the machine network or USB transfer.
Why This Method is Essential:
It guarantees compatibility and unlocks the machine’s full potential. The software allows you to tweak parameters that generic converters simply ignore.
Method 2: Professional Digitizing Services with Industrial Expertise
Many embroidery shops outsource their digitizing to specialists. For ZSK files, you must choose a service that explicitly understands industrial machinery.
How to Vet a Service for ZSK:
Do not use a service geared toward home machines. Look for providers that:
-
Explicitly list .ZXY format and ZSK support.
-
Mention “industrial digitizing,” “high-speed optimization,” or “production-ready files.”
-
Have a portfolio showing complex, high-stitch-count designs typical of cap fronts, jacket backs, and technical apparel.
The Process:
You send the source file (ideally a vector .AI or .EPS for logos) and a detailed spec sheet including:
-
Target dimensions.
-
Exact substrate (e.g., “6-panel structured cap,” “500D Cordura,” “performance mesh”).
-
Stitch count limits (if any).
-
Any ZSK-specific notes from your operator.
A skilled industrial digitizer will then create a .ZXY file with proper underlay, stitch dynamics, and compaction for speed.
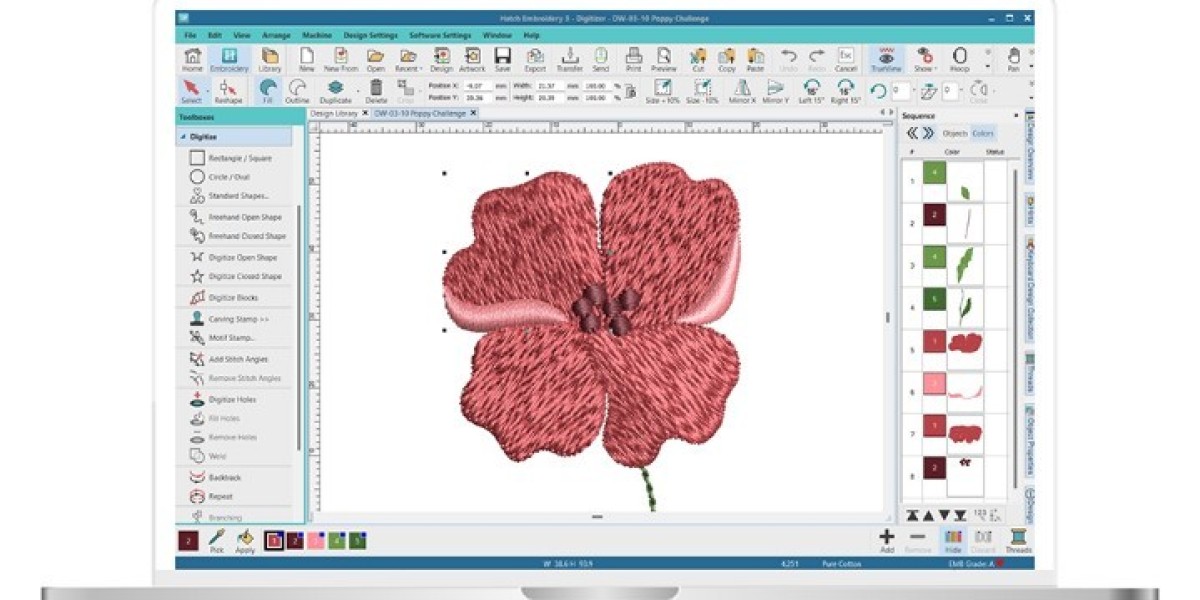
Method 3: High-End Professional Digitizing Software
While ZSK’s software is ideal for conversion and optimization, the initial digitizing (turning an image into stitches) can be done in other high-end software before final conversion.
Industry-Standard Software:
-
Wilcom EmbroideryStudio: The global benchmark. Its advanced tools allow for creation of designs that are then exported to .DST or .EXP, which can be subsequently converted to .ZXY in the ZSK software.
-
Hatch Embroidery: A powerful, more user-friendly branch of Wilcom. It excels at initial digitizing but will still require final conversion/optimization in ZSK software for best results.
The Hybrid Approach: Many top shops use this method: a designer digitizes in Wilcom or Hatch for its creative and auto-features, then a technician imports that file into ZSK JCK for final speed optimization and .ZXY export. This leverages the strengths of both platforms.
Critical Factors for ZSK File Success
Converting the file is just the start. These factors determine if it will run well:
-
Stitch Density & Length: Industrial machines running at high speeds require slightly longer stitches and adjusted densities compared to home machines to prevent thread breaks and heat buildup. The file must be digitized with this in mind.
-
Trim Optimization: Excessive trims kill production speed. A good .ZXY file will have minimized trims through intelligent stitch sequencing and jump-stitch commands where safe.
-
Fabric-Specific Parameters: The file for a dense twill cap must be fundamentally different from one for a stretchy knit. The digitizing must account for push/pull compensation specific to the substrate.
-
Underlay: Proper underlay is the foundation of a stable design, especially at high speeds. The file must include the correct underlay type (edge run, center run, zig-zag) for the topstitch and fabric.
Step-by-Step Implementation Guide
-
Secure a Vector Source File: Always start with a client’s vector logo (.AI, .EPS, .SVG). Never digitize from a low-res JPG for industrial work.
-
Choose Your Path:
-
In-House Workflow: Digitize in Wilcom/Hatch → Optimize/Convert in ZSK JCK → Save as .ZXY.
-
Outsource Workflow: Send vector and specs to an industrial digitizing service → Receive .ZXY file.
-
-
Conduct a Rigorous Test Stitch: This is non-negotiable. Run the .ZXY file on the exact production material. Check for registration, puckering, thread tension, and overall stability at the intended production speed.
-
Tweak and Archive: Use the ZSK Stitch Editor to make micro-adjustments based on the test. Once perfect, archive the .ZXY file with clear naming linked to the client and substrate for future reorders.
Conclusion: Engineering Files for Excellence
Learning how to properly convert designs for ZSK embroidery machines is what separates adequate production from exceptional, profitable output. It’s a process of engineering and optimization, not just simple format translation. By leveraging ZSK’s native software for final tuning, partnering with digitizers who speak the language of industrial speed, and adhering to a disciplined workflow that prioritizes substrate-specific testing, you ensure your ZSK machine operates as the precision instrument it was built to be.
The right file unlocks the machine’s potential for breathtaking speed and flawless quality. Treat the .ZXY file as a critical component of your production line—one that requires expertise and care. Invest in the correct tools and processes, and your ZSK will reward you with unmatched efficiency and stitch-perfect results, order after order.